Friday, July 15, 2011

Breuer Bench

Inspired a couple of years ago by a blog post (http://www.designsponge.com/2009/07/before-after-martinas-bench-kellys-dining-room.html), I saved 2 cesca chair frames (that had previously busted caning) with the intention of building a bench. They sat in the garden for all that time, and I'm pleased to say have weathered 2 severe winters with barely a patch of rust.We have been in need of extra seating at our garden table, and I knew I wanted to make the bench work there. After pondering the different materials for the seat and back, I remembered we had leftover teak flooring from the living room, and decided this would be an excellent use of it.

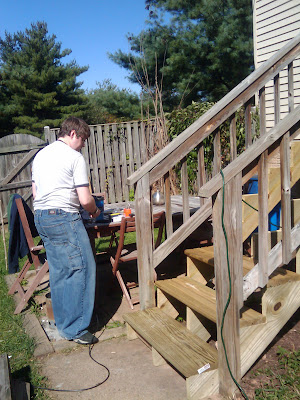
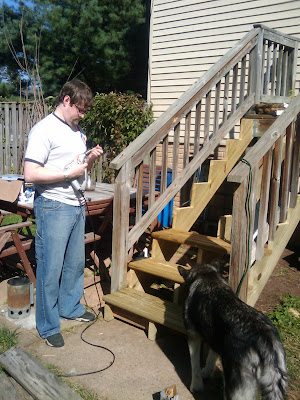
So I had T chop me 5 equal pieces of the teak in the longest length we could (forgot how gross the teak smells when you cut it!), and we screwed them into the pre-existing holes in the frames. Because we wanted 3 pieces for the seat, but only had 2 holes where the caned seat frame used to sit, we used 2 smaller pieces of teak to screw the three lengths together.


We already had the teak & the frames, and both were pretty much free, so this project cost us deck screws - about $9.


Voila! A bouncy Cesca bench for two!

Lazy Veg Patch

Last year, we tried growing some veg in pots. A combination of forgetting to water, weeds and dastardly (but adorable!) little chipmunks made for not a great harvest.
This year, we decided it was time to build a raised bed. After much googling and indecision about what to use (cedar/trex?) we decided to go over to the old HD and grab some cinder block. The main reason being, there was no screwing/nailing required, and no worries about termites infesting the concrete blocks. Plus we could plant little strawberries in the holes!

It turns out a pallet will not fit in the back of the wee Ranger, so we had to load the 32 blocks in by hand with the help of the dudes in orange. Not too bad. However, carrying them from the car park to the garden was not as much fun for poor T, who suffered for it the next day. (I carried 2!) I was in charge of clearing the very weedy ground, laying out the landscaping fabric and stacking the blocks.

I was aiming for something about 2' wide, but due to extreme lack of proper planning we ended up about 3' which is a little deeper than I would like, given once the plants grow it will be a little tougher to reach the back. We decided to stack 2 high, to give enough depth for potatoes, and to stop Madra peeing on our food.


We filled this bad boy up with a mix of top soil and bumper crop, and planted red and white onions, potatoes, chives, spring onions, lettuce and carrots.

Next step will likely be to protect the top from the dastardly chipmunks with some pvc pipe and netting.

Fingers crossed we will soon be eating from our garden!

Thursday, June 2, 2011

....After!

As promised, here are the 'after' shots from our planting adventures. Although I like to think I'm a 'gardener', the truth is that I pick a plant I think is pretty, read the label (sun/shade), and jam it in the ground in the hope it will like its new home and stay alive.

So far everything actually seems to be doing pretty well, except for some wilting due to my forgetful watering skills and the boiling hot weather we are having.

I started out with a new pot by the front door and hanging basket, and filled them with tulips, astilbe, ranunculus, poppies and marigolds.

The tulips and ranunculus are gone now :( but the rest are doing well.

We also picked up 100 or so bricks and edged the beds with them to stop the mulch falling out all over the garden. They need a bit of realignment, as I didn't dig a trench for them (lazy!) but they are staying in place pretty well after about a month.

So leading up to the front door we have some boxwoods and other evergreens at the back, mixed with some spiky things (dragon grass or something?) that I wasn't sure would like this very shady spot, but they have actually been thriving. At the front are some ferns mixed with some annuals, and a very cool succulent!

The once sad and lonely evergreen actually seems to be picking up, as if by being surrounded by plant friends he has found the will to live again. Nearby are hostas and my never-flowering day-lilies.

The big green bushy thing on the corner is an evergreen that is red and green, but seems to have lost its' red in the last week or so. There is a smaller one to the right too.

Around the side of the house, which gets the most sun of the foundation plantings, we had planted a couple of hostas last year, along with the 'dead' bleeding heart and the only surviving azalea. I added a tall holly bush, a peony (yet to flower), lavender, rosemary, a couple of variegated evergreens and some liriope grasses.

The tall tree thing by the door is an unknown sprout T-Rex found in the back garden and relocated to here. This is how he gardens - find something growing, stick it in the ground. If it grows, leave it (no, it doesn't matter if he has any idea what it is). The fact that there is now some kind of tree growing very close to the foundation is a little worrisome.

The sad evergreen - less gappy than before, surrounded by friends :) Last years hostas doing well, a columbine and a couple of new rhododendrons with pretty blue/purple flowers.

And of course a gratuitous pup shot for Madra's fans....


Flowers, finally! Before....

The 2+ years we have lived here, the foundation plantings have been pretty neglected. With so much work to do in the house, expensive planting just wasn't going to happen.

When we moved in, the previous owners had torn out everything in the beds, including about a foot of soil, exposing all the unpainted basement walls. There was one lonely, half dead evergreen in the front, and a giant, gorgeous rhododendron in the back garden, with a climber (virginia creeper maybe?) on the fence, along with that horrific Locust sprout detailed in an earlier post! That was it.

The grass was also having a really hard time, after all the snow, and Madra churning it up with her giant paws. (Back garden post to follow soon!)

Dad came over and planted us a couple of azaleas, one of which is still (mostly) alive.

Over the years, I have attempted to cultivate the odd plant here and there, and a few have lasted. Others, like this once lovely grass, didn't fare so well.

I thought I had killed a bleeding heart under the chimney here, but it came back this year :)

The hostas have all done well, even with the slug attacks, as has a columbine out front. But we had only the one evergreen, and the whole place was looking very bare.

So, after the wedding, we finally bit the bullet and went off to the nursery to get some much needed plants. A day of digging and planting resulted in all these plants finding new homes. Despite my terrible parenting, they are doing pretty well about a month later.

Watch out later for a post with pics of new plantings!

Tuesday, February 9, 2010

Kitchen pics

I previously posted some hideous 'before' photos of the kitchen when we moved in. It was not only horrible, but also unusable. It was filthy, the tap sprayed water everywhere, and the dishwasher just grunted.

On moving in, we immediately ripped out the kitchen and replaced it with new Ikea Lidingo cabinets, topped with butcher block countertops. We pulled down the outdated cabinets that hung from the ceiling and drywalled the hole. Instead of the oversized peninsula from before, we added 42" glass door cabinets facing the rest of the room, and created a bar area that shields the (usually messy) kitchen workspace from view. Some vintage 50's Philly diner stools make a great place to eat breakfast!
Our wonderful realtor blessed us with a new dishwasher, and we installed an over-the-range microwave. We pulled down the headache inducing fluorescent light that all DC area builders seem to believe home-owners want in their kitchens, and replaced it with a fixture we had waiting for something else. This will be switched for track lighting at some point.

The kitchen still isn't finished - it needs trim, backsplash (we have white subway tile waiting to be installed), and a new oven and fridge. Eventually, we will also replace the always-dirty tile floor. But for now, it's workable and a million times better than it used to be. So here are some 75%-of-the-way photos! (Excuse the mess - I didn't clean up to photograph!)

Tips for cleaning: host a party!

When the house gets really messy, there's only one thing to do. Throw a party!

The looming deadline of having a number of people coming over to your home enforces a tight cleaning schedule and fun times at the end of it! The results aren't show-house quality, but they are a significant improvement!

We hosted for the super bowl last weekend, which meant a couple of days of frantic cleaning and tidying beforehand. The mammoth blizzard DC has been experiencing meant it almost didn't happen, but luckily a few people were able to fight their way through the aftermath of the storm. I think the lure of hot chilli must have been too strong to resist... :)

Since we did some cleaning, I thought I would upload some long overdue pictures of the living room with furniture back after the laying of the floor. It's definitely time for a new camera, and probably a few photography lessons for me too. The lack of decent overhead lighting in THATC makes everything look a little dreary in photos, but it's actually more cosy than dismal. Day to day living in a house undergoing long, drawn-out renovations can be painful - there is always construction stuff everywhere, and it's hard to 'finish' a space. (note the 9ft teak plank leaning on the bookshelf, awaiting it's future home...) I look forward to the day when we don't have any more renovation projects at THATC and I can concentrate on the 'decorating'!

So, without further ado, here are a few (badly lit) pics, enjoy!


Of course, I had to add one of Madra enjoying her kong on the rug!

Wednesday, December 2, 2009

New floor!

Since we moved into THATC, we have been longing to tear up the stained beige carpet in the living room. It wasn't very attractive, and was only good for soaking up the occasional beer spillage.
2 weeks ago I happened upon an ad on CL for 230sq ft of solid oak flooring for $50. It wasn't enough for our living room, but I can't pass up a bargain :)

After emailing, it turned out to be at Lumber Liquidators. The store manager was really helpful, and said he thought he could find us more stock to use with the oak, and create some kind of border. I thought he would try to sell us more flooring at a close to normal price, so we were pretty happy when we got there and the guy who helped us found us another end lot of 270 sq ft of teak, which he sold us for $100!

So we had enough wood to do the entire living room and passageways, but had to be a little creative about how we laid it out. After laying it out in autoCAD, we decided to use the oak to border the teak, and hoped we would have enou
gh!
Ripping out the carpet and pad (with a million staples holding it down) then smashing up the tile (only 2 whole pieces came up) was painful. The 2 days it took us to install the wood was even more painful.

We still have to put all the furniture back, poor A-Rod has had his basement taken over. The kitchen is full of furniture, and the dining area stuffed with couches.

Madra hid in the bedroom for most of the time, with the noise of the pneumatic nailer, air compressor and chop saw, she wasn't too happy! When she did occasionally venture halfway down the stairs during quiet periods, she assumed the position of supervisor:

We are 98% done now, with just some pieces still to be face nailed in. Here is how it looks now, along with a 'before' picture which I used to give away the old carpet on CL :) A nice girl came and picked it up today! This pic is a little dark, but it's close to the colours. The teak is really beautiful, with lots of natural variation. We are pretty happy with the results.

Monday, October 12, 2009

It's Finally Safe To Leave The House...

By the back door!

When we bought the house, the 'deck' (really a glorified landing) was crumbling and falling apart. Boards were rotted through, the handrails were no longer attached, and there were even steps missing, which led to people (and pets) falling through a couple of times!

We basically avoided using them as much as possible, and prayed that no one would get severely injured on them before we had a chance to fix them.

Watching a 75lb dog run up and down a couple of times a day, and the steps bowing under her, we realised we would have to replace them, now.
After a trip to HD and Lowes, we found the stand
ard stringers were only premade up to 6 steps - we needed 8. We visited Tart Lumber, who told us they would happily make the 8 step stringers, at a cost of around $78. Per stringer. We needed 3. (Although the old stairs had only 2 - deathtrap!)

The wood itself was only $17 per length, so T decided we were doing it ourselves.
We bought the pieces of wood needed (12"x2"x12') and drove them home sticking 4' out the back of the Versa at 50mph. That was fun.
Out came the skilsaw, jigsaw and drill. We used the old stringer with the least chunks missing as a template. I marked up the new pieces of wood and T cut the triangles out. We then lined them up, made a few adjustments here and there, and screwed them to the deck using metal brackets (a little more sturdy than the 25 yr old nails holding in the previous ones!)

We then attached the 8 brand spanking new treads (premade from Lowes) with screws.
We reattached the handrails and added some support to them at the bottom posts, so they are now pretty sturdy.
I then ran up and down the new stairs repeatedly. They are very sturdy!

They passed Madra's inspection.

Poochums!


On September 12th, we became proud parents to an Alaskan Malamute, Madra! She came from a puppy mill where she was being bred from, and kept in pretty sad conditions. I haven't written about her yet because she was very sick when she first arrived, and we weren't sure what was wrong with her. I'm happy to report that the vet is very pleased with her progress, and she is settling in great at THATC.
Here she is on her new 'Coolaroo' bed, with Sheepy (sticking out under her head). The Coolaroo is great for her - Mals do not like to be hot, and this keeps her off the floor with airflow. As the days have gotten cooler this week though she has also enjoyed lounging on the wool shag! :)

Extreme Makeover: Home Edition

I wasn't able to post anything at the end of August, as I was working on an episode of Extreme Makeover in DC with Burch Builders Group, where I have been interning.

http://www.burchbuildersgroup.com/

We rebuilt The Fishing School in one week. It was a great project, very tiring but extremely worthwhile! The original school was around 2000sq ft, and the new building is about 6500sq ft. All the extra space will make a real difference to the after school and community support program.

I can't post proper pics yet as the show hasn't aired, so it's still pretty secretive. We were scheduled to be aired in November, but it's now looking like February. The new season has begun, so keep watching!

Here is a sneak preview of the close to end result: